Showing posts with label Android Programming. Show all posts

Thursday, 21 August 2014

7. Android UI - FormWidgets and Layouts

In android, all user interface elements are built up using View and ViewGroup objects.
View is a base class for widgets like textboxes, edit text boxes, buttons and all such components with which user can interact.
ViewGroup on the other hand is base class for layouts. User cannot interact with view groups directly but they act as container for different Views and view groups and are used to organize contents of the screen.

Form Widgets (Views)
1. Buttons - buttons are widgets which allow user to perform some actions on touching it. We can use either Button class or ImageButton class depending upon whether we want to display text or an image on the button.

         <Button android:layout_width="fill_parent"
            android:layout_height="wrap_content"
            android:text="Login"/>


2. Text Fields - text field allows user to enter text in the app. As soon as user touch a text field, it displays the cursor and keyboard automatically. We can specify input type as well for example: text, textEmailAddress, number etc and thus virtual keyboard will open accordingly.

  <EditText android:id="@+id/email"
    android:layout_width="fill_parent"
    android:layout_height="wrap_content"
    android:inputType="textEmailAddress" />

3. Checkboxes - Using checkboxes, user can select multiple options from a set. 

   <CheckBox android:id="@+id/checkbox_option"
      android:layout_width="wrap_content"
      android:layout_height="wrap_content"
      android:text="Option 1"/>

4. Radio Buttons - Radio button allows a user to select only one option from a set. As radio buttons are mutually exclusive, these must be grouped together inside radioGroup.

 <RadioGroup android:layout_width="fill_parent"
    android:layout_height="wrap_content"
    android:orientation="horizontal">
       <RadioButton android:id="@+id/radio_yes"
                                          android:layout_width="wrap_content"
                                          android:layout_height="wrap_content"
                                          android:text="Yes"/>
                                       <RadioButton android:id="@+id/radio_no"
                                          android:layout_width="wrap_content"
                                          android:layout_height="wrap_content"
                                          android:text="No"/>
                           </RadioGroup>

5. Toggle Buttons - Toggle allows user to change a setting which can be in two states. (Yes/No, On/Off)


   <ToggleButton 
    android:id="@+id/togglebutton"
    android:layout_width="wrap_content"
    android:layout_height="wrap_content"                             android:textOn="ON" android:textOff="OFF"/>

6. Spinners - It also allows user to select a value from a set. However, touching the spinner displays a drop-down with all other values and user can select a value from this list. We can use <Spinner> element for creating spinners. To populate spinner with values, we need to write Adapter in source code.
  <Spinner
    android:id="@+id/spinner"
    android:layout_width="fill_parent"
    android:layout_height="wrap_content" />

7. ProgressBar - It is used to show progress of a task for example while uploading or downloading from internet.

Different Layouts (View Groups)
1. Linear Layout - In linear layout, all the elements are displayed in a linear manner (either vertical or horizontal) using android:orientation property.
<LinearLayout android:orientation="vertical"> .... </LinearLayout>
OR
<LinearLayout android:orientation="horizontal"> .... </LinearLayout>

2. Relative Layout - in this, every elements arranges itself relative to sibling elements or parent element. We can arrange these using different attributes: android:layout_alignParentTop, android:layout_centerVertical, android:layout_below, android:layout_toRightOf.


<RelativeLayout android:layout_width="fill_parent"
    android:layout_height="fill_parent" >
    <EditText android:id="@+id/name"
        android:layout_width="fill_parent"
        android:layout_height="wrap_content"
                                                 android:hint="Your Name" />
                                                <Button android:layout_width="96dp"
                                                 android:layout_height="wrap_content"
                                                 android:layout_below="@id/name"
                                                 android:layout_alignParentLeft="true"
                                                 android:text="Cancel" />   
                                               <Button android:layout_width="96dp"
                                                 android:layout_height="wrap_content"
                                                 android:layout_below="@id/name"
                                                 android:layout_alignParentRight="true"
                                                 android:text="Ok" />
                                           </RelativeLayout>

3. Table Layout - Using table layout, we can arrange items in rows and columns.

<TableLayout
    android:layout_width="match_parent"
    android:layout_height="match_parent" >
<TableRow android:layout_width="fill_parent"
                                            android:layout_height="wrap_content"
                                            android:gravity="center_horizontal"
                                            android:padding="15dp" >
                                        <TextView android:layout_width="match_parent"
                                            android:layout_height="wrap_content"
                                            android:text="Row 1 column 1"
                                            android:padding="15dp" />
                                         <TextView android:id="@+id/TextView04"
                                            android:gravity="center"
                                            android:text="Row 1 column 2"
                                            android:padding="15dp" />
                                        </TableRow>
                                    </TableLayout>

4. List View - it displays list of scrollable items. Items are inserted into the list using an Adapter class that extracts data from a source like DB query or an array. 

5. Grid View - this is used when we want to show data in the form of grid(mainly images or icons). Audio/video players also used grid layout to show thumbnail images. Again, items are automatically inserted into grid using ListAdapter.

<GridView android:layout_width="fill_parent"
    android:layout_height="fill_parent"
    android:numColumns="auto_fit"
    android:columnWidth="90dp"
    android:horizontalSpacing="10dp"
    android:verticalSpacing="10dp"
    android:gravity="center"
    android:stretchMode="columnWidth" >


Saturday, 9 August 2014

6. Android Components Lifecycle

An android application can have several components. and every application runs in its own Linux process. Process gets created whenever any one of the components gets activated. In android, every component has its own lifecycle.

Activity Lifecycle

An activity could be in 3 states: resumed, paused or stopped.

In resumed state, activity is in the foreground, occupying the screen and this is the activity that will respond to any manipulation of the screen by the user.
In paused state, an activity has lost focus but still visible to the user. However, it will not receive any input. For example, dialog box pops up on the screen and hides the activity in the background.
In the stopped state, the activity is completely off screen. We cannot see it but is there somewhere in the background. Activity will still retains all states and member information in stopped state.

Within android, an activity goes through a lifecycle as shown in below fig (activity lifecycle methods):

As activity transition from one state to another, it is notified by the change by calls to these protected methods: onCreate(), onStart(), onRestart(), onResume(), onPause(), onStop(), onDestroy().
  • onCreate() - called when activity is first created.
  • onStart() - called just before when activity becomes visible to user.
  • onRestart() - called after the activity has been stopped, just prior to being started again.
  • onResume() - called just before the activity starts interacting with the user.
  • onPause() - called when system is about to start resuming another activity. This method is used to commit unsaved changes, stop animations etc.
  • onStop() - called when activity is no longer visible to user (being destroyed or covered by another activity).
  • onDestroy() - called before the activity is destroyed.

Service Lifecycle

A service always runs in the background and thus never occupies the screen. However, an activity in the foreground needs to interact with the service, for ex- if we click download button on the screen, the download work has to be offloaded to the service in the background. So activity needs to issue a call to the service for this.

We can use service in two ways:
  • The service can be started and allowed to run until someone stops it or stops itself. Here, it can be started by calling Context.startService() and can be stopped by calling Context.stopService().
  • In another way, client establish a connection to the service object and use that connection to call into the service. It is done by calling Context.bindService() and closed by calling Context.unbindService().

Broadcast Receiver

A Broadcast Receiver have just one callback method (onReceive()) in its lifecycle. When android realizes that it need to deliver notification, it issues a call to onReceive() callback method of broadcast receiver. So at this point broadcast receiver becomes active. Once the onReceive() method is completed, the receiver disappears.


Saturday, 19 July 2014

5. Creating Simple HelloWorld Android Application

Before creating the app, first we need to create a virtual device on which we can run and test our applications. We can also run apps directly on physical device by simply connecting that through USB.

Create Android Virtual Device in Eclipse

1. Go to Window -> Android Virtual Device Manager.
2. Select 'New' from 'Android Virtual Devices' tab and provide details for example as shown below and click Ok. Here we can set the device type, target android platform, memory and other such properties:


3. This will create a new AVD. To launch this device, select this newly created device, click on start and then launch.

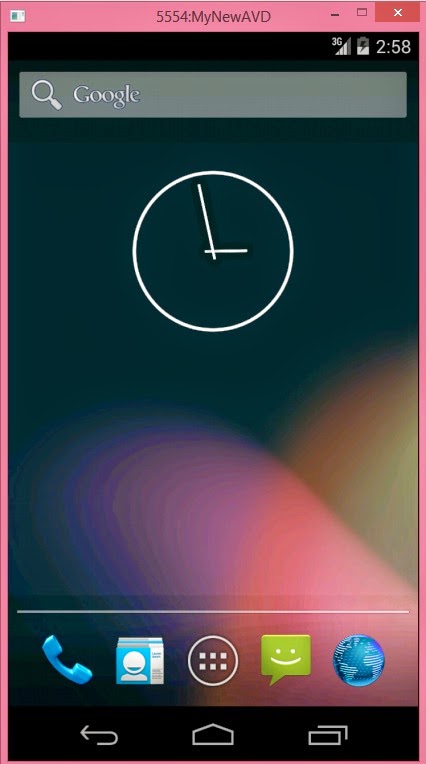
4. For the first time, it will take some time to launch the device. This is how the virtual device would appear:


Creating HelloWorld Application

As we are done with creating the device, we can proceed with creating the HelloWorld app:

1. Go to File -> New -> Project. Select project type as 'Android Application Project'. Here, provide application name, project name and package name.

2. Click on next and leave defaults on configure project window and configure launch icon window.
3. On create activity window, give activity name and layout name:

4. Click on finish and you should see a new simple android application project popping up. Save all and click on Run As -> Android Application

5. The app will start on the AVD we created:


Wednesday, 16 July 2014

4. Android SDK - Download and Installation for Eclipse

Here are the steps of how to install android SDK tools for using with the eclipse environment.

Go to android developer download page (here)

OPTION 1
If you are installing this from scratch, click on 'Download Eclipse ADT with Android SDK'. This complete bundle comes with eclipse and ADT plugin and all other tools.


OPTION 2
Another way is to do it manually which will install few less items and thus take less space on hard drive. Below are steps for the same:

1. On the same page, select 'View all Downloads and sizes' and download the suitable zip file for your platform.


2. Once the zip file is downloaded, extract that somewhere inside program files directory. After extracting, folder structure would look something like this (after extracting, i renamed the folder to android):


3. After all this, we need to install plugins for eclipse, so that eclipse can work with this android SDK. Firstly, open eclipse, go to help -> check for updates. Make sure that eclipse is up-to date.

4. Then go to help -> Install new software. From here, we install the plugins for using android. enter below url in 'Work with' field:
https://dl-ssl.google.com/android/eclipse
select 'Developer Tools', click on next
(if developer tools is not visible, then something is wrong with your internet connection or you might have entered the wrong URL above)


5. click on next and select all. This will install all the plugins.

6. Now restart the eclipse. On startup, it will show an error message likw 'Location of the Android SDK has not been setup in the preferences'.
Click on Open Preferences. Here, we need to provide the SDK location, where we extracted the android SDK (C:\Program Files (x86)\android).
On clicking apply button, eclipse will ask to install SDK platform component tools using SDK manager. From SDK manager, install Tools and the Android APIs for different versions.


7. So now we are done with installing the SDK and all of the separate packages. To check if everything is working fine or not, go to File -> New -> Project. Here, you will see Android directory for creating new project as shown below. If it is not there, then something is wrong with the installation.


Saturday, 12 July 2014

3. Android Application Components

Components of Android Application

An android application can have mainly four basic components: Activities, Services, Broadcast Receivers, Content Providers.

Activity

  • Activities are components that are somehow related to dealing with users and seek interaction with the outside world. So whenever we need to present a screen to a user, that screen  is supported by an activity. Again, on navigating from one screen to another, every screen is supported by an activity.
  • An application can have one or more activities and each activity has a default window to draw.
  • Any activity extends the 'Activity' base class.
  • One activity is marked as the main activity (which starts when application begin).
  • Moving from one activity to another is accomplished by having the current activity start the next one.

Services
  • If we need to do something in the background, such things are supported by Services. So generally, services are designed for doing things in the background. For example downloading a file or playing a music file in the background is supported by a service.
  • We need to extend the 'Service' base class.

Broadcast Receivers
  • Now when the background work finishes, it need to notify us that the work is completed and whatever we needed is ready. This back notification is supported by Broadcast Receivers. So job of Broadcast Receivers is to identify the events that happened somewhere. For example, we receive email notification or notification for app installation.
  • These do not have a user interface.
  • In response to received broadcast, these can start an activity.

Content Provider
  • Finally, the job of Content Provider is to manage interaction with the DB in the background and provide us an API to interact with the background.
  • We need to extend 'ContentProvider' base class to implement a standard set of methods that enable other applications to retrieve and store data.

So within our application we might have different functionalities that need to be done and we need to divide these functionalities in pieces based upon the kind of work each one of them is doing and allocate them to one of these components.

Activating Components

We can activate these components using Intents and Content Resolver.


Intents

  • Intents are asynchronous message objects to activate components other than content providers. In simple terms, it a way to trigger somebody to do something.
  • For activities and services, message consist of action being requested (MAIN/VIEW/EDIT/PICK/DELETE/etc) and URI of the data to act upon.
  • For broadcast receivers, message is the action being announced.
  • Explicit Intent - explicitly specify the component's name that should respond to the intent. example:
     public void onClick(View v) {
       startActivity(new Intent(welcome.this,menu.class));
     }

  • Implicit Intent - android locate the best component that can respond to the intent. for example:
     startActivity(new Intent(Intent.ACTION_VIEW,
     Uri.parse("http://google.com")));

Shutting Down Components

  • Activities and services need to be shut down explicitly.
  • No need to explicitly shut down content provider and broadcast receiver.
  • A content provider is active only while responding to a request from a ContentResolver. A broadcast receiver is active only while responding to a broadcast message.
  • Components might also be shutdown by the system when they are no longer be used or when android must reclaim memory for more active components.


Friday, 11 July 2014

2. Android Architecture

Android architecture is a stack of layers. At the bottom of it is linux kernel. On top of that we have libraries which are native libraries developed in C/C++. These are the libraries which expose the capabilities through application framework which are intern used by the applications. So the key thing which application framework is doing here is to enable reuse of various components.
(Libraries and the application framework is what we call middleware).


Applications

An application can be seen as the first point of contact with the android platform. Android itself comes with a certain group of applications which are built in any standard android device for example:
Email client, SMS program, Calender, Maps, Browser, Contacts.

In addition we can write our own applications and all are created equally using the java language.

Application Framework

Down below the applications, android provides an application framework which captures certain key functionalities that are provided for users. This further enables and simplifies reuse of components. Developers will have full access to the same framework APIs used by the core applications.

  • View System - Used to build an application, including lists, grids, text boxes, buttons, and embedded web browser.
  • Content Provider - Enabling applications to access data from other applications or to share their own data.
  • Resource Manager - Providing access to non-code resources such as localized strings, graphics, and layout files.
  • Notification Manager - Enabling all applications to display custom alerts in the status bar.
  • Activity Manager - Manages the lifecycle of applications and provides a common navigation backstack.

Libraries and Runtime

In addition, android comes with a whole bunch of libraries which are underneath and provide lots of useful functionality. Everything here is written in C/C++. This is the level where core power of android comes from.

Surface manager is responsible for composing different drawing surfaces onto the screen and make sure that pixels should end up displaying on the screen when they are supposed to.
OpenGL | ES and SGL make the core of graphics libraries. OpenGL|ES is a 3D library and SGL is for 2D graphics. So using these, android facilitates the combination of 2D and 3D graphics in the same application.
Media framework was provided by PacketVideo(a member of OHA). This contains all of the codex for media experience.
FreeType is used to render the fonts.
SQLite is used as the core of our data storage.
SSL (Secure Sockets Layer) is crystallographic protocol for secure internet communications.

Android Runtime

Android runtime is specifically designed for android to meet the needs of running in an embedded environment where we have limited battery, limited memory & limited CPU.
Main component in runtime is the Dalvik virtual machine. This DVM runs .dex files. These are byte codes that are the results of converting at build time .class or .jar files. These files when converted to .dex become a very efficient bytecode that can run on small processors.
Another part in runtime is core libraries(written in java). It contains all the collection classes, utilites, IO and all other similar classes that we come across while programming in java.


Linux kernel

The complete architecture is based on linux kernel which is the hardware abstraction layer. Linux provide a proven driver model, memory management, process management, security model, networking and other robust operating system features.


Friday, 27 June 2014

1. Introduction to Android

Why Android ?
  • Android has >50% of the smartphone market. Blackberry, windows mobile are rapidly losing market share since their platforms not nearly as interesting to develop for as android/iPhone.
  • Android is the fastest growing smartphone platform. Open source & works on multiple platforms (no need to own a Mac).
  • Easy to learn for Java(& C++) programmers. Much easier to transition to than objective-C.

What is Android ?

Android is an open software platform for mobile development. It is a complete stack that includes from operating system through middleware and up through applications:


1. A variant of the Linux OS optimized for power conservation & local IPC.
2. An optimized Java Virtual Machine(Dalvik), a subset of Java libraries running on Dalvik, native C/C++ libraries & a hardware abstraction layer.
3. Middleware, including GUIs, telephony services, camera, multimedia, app frameworks, app distribution etc.
4. Then there are common set of apps provided by different vendors along with phone.

Open Handset Alliance (OHA)


  • It is a group of 80+ companies that covers the entire area for mobile devices. 
  • There are software companies that are focused on application development. 
  • Then there are commercialization companies like Accenture, Wipro, L&T infotech etc.. that support the platform through a professional services model 
  • Various mobile operators are there like vodafone, Sprint, docomo etc..
  • Handset manufacturers like HTC, Samsung, Sony and others who are manufacturers for android devices are also part of OHA.
  • Lastly there are semiconductor companies that supply the chips for these.
So all of them have grouped together and formed this OHA under which they support the android platform.

Android Platform Versions

After android beta version (Nov 2007), first commercial version, Android 1.0 was released in 2008.
Since then, all versions were developed under a themed code name and released in alphabetical order:
  • Cupcake (1.5)
  • Doughnut (1.6)
  • Eclair (2.0–2.1)
  • Froyo (2.2–2.2.3)
  • Gingerbread (2.3–2.3.7)
  • Honeycomb (3.0–3.2.6)
  • Ice Cream Sandwich (4.0–4.0.4)
  • Jelly Bean (4.1–4.3.1)
  • KitKat (4.4–4.4.4)